Wednesday, March 11, 2015

Small Batch Grandma Meatballs

Balls.  Meatballs.  Balls of meat.  In your mouth.  Doesn't that sound delish?  These are grandma's meatballs.  There is much debate in my house over the best way to make meatballs.  Do you bake them? Fry them?  Grill them (Huh?!)?  Mom bakes them, and Grandma fries them. #Confused.

In an effort to not get disowned be fair, both methods result in fantastic meatballs.  With that said, there is just something about using the Grandma Method for anything that makes it an automatic winner (sorry Mom!).  


What you will need for 10-12 medium sized meatballs:
  • 1 batch of Grandma's Sauce
  • 1/2 pound of ground beef at room temperature
  • 1/2 pound of ground veal at room temperature
  • 1 tablespoon of Basil
  • 1 tablespoon of Oregano
  • 1 tablespoon of Parsley
  • 1 tablespoon of Parmesan cheese
  • 1 tablespoon of seasoned bread crumbs
  • Olive oil
  • Salt to taste

First, prep the meatballs:

In a large bowl, using your hands, mix the beef, veal, Basil, Oregano, Parsley, Parmesan and breadcrumbs until well combined.  Taste the mixture and add salt or additional seasoning as desired.  Dampen your hands with cold water, and form the meatballs to your size preference.  Set aside on a baking sheet.


Now, start the sauce as per the recipe.  When the sauce is about to boil, heat a large frying pan with enough olive oil to coat the bottom of the pan.  Brown the meatballs for about 2 minutes on each side- you want the top and bottom of the balls to be cooked and the middle to be raw.  

Place the meatballs in the boiling sauce and cook over low heat (pot covered) for 30 minutes.


Serve immediately, or let cool and store in the fridge for up to 5 days.  


I hope you enjoy the taste of these balls as much as I do!


Xoxo

Jillian


Monday, March 9, 2015

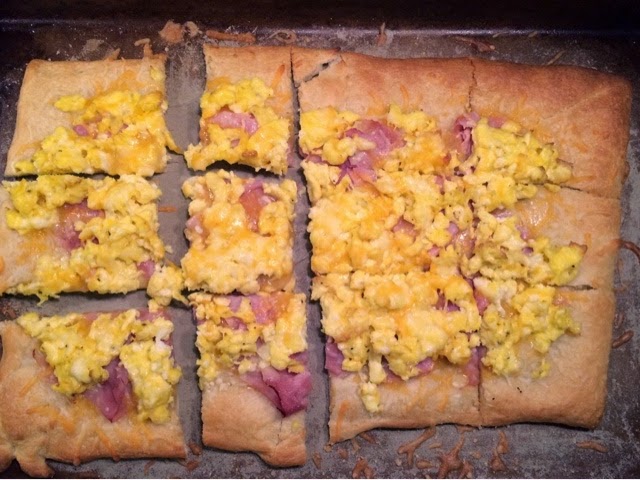
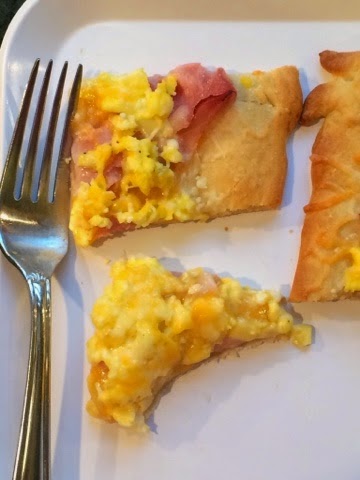
Crescent Roll Breakfast Pizza

Monday!  Monday!  Gotta get down on Monday!

Wait.  That's not right.

How was everyone's weekend?  What'd you do?  Who'd you see?  Why am I interrogating you?  Too much coffee?  Hellz no!

Do you like breakfast?  Yes you do - what kind of question is that?!?  As I may have mentioned 652 times, I love breakfast.  Breakfast all day erryday.  Breakfast for breakfast, lunch, and dinner.  You catch my drift?  This recipe is my favorite weekend breakfast situation.  You can put whatever you want on the pizza, and it only takes about 15 minutes to make!  Holler!


I made this pizza last week after yet another snow "storm".  I am saying "storm" because it was bad but it could have been worse.  And also I am just sick of this shit.  Where the eff is spring?!?  I need some sunshine and a tan.  I basically blind myself with my own paleness.  Bathing suits and shorts are out at Target and I can't even bring myself to try anything on because I am afraid of what lies beneath.  I am so pale, I'm pretty sure I glow in the dark.  I ask for coffee with extra milk, aka as pale as I am. #womp.  Somebody come and paint me.


What you will need for 1 pizza, which will serve 3 or 4:
  • 1 can of Pillsbury Crescent Rolls (or whichever brand you like)
  • Shredded Mexican blend cheese, for sprinkling
  • 2 slices of ham
  • 3 eggs, scrambled
  • Salt and pepper to taste

Preheat your oven to 325.

Remove the crescent roll from the can and roll out onto a baking pan.  Press the edges of the rolls together to create a rectangle.  Bake for 5 minutes to "prebake" the dough.


While the dough is baking, cook your eggs.  Spray a small pan with non-stick spray, and heat for about 30 seconds.  Scramble the eggs in a separate bowl, and season with salt and pepper.  Add to the pan and scramble to your desired firmness.  Set aside.


Sprinkle a light layer of the cheese on top of the warm dough.  Tear the ham in to small pieces and spread evenly on top of the cheese.  Add the eggs, and top with another sprinkling of cheese.

Bake again for 7-10 minutes, or until the crust is golden brown.

Serve immediately.


And if you're Charlie, go to sleep.


Xoxo


Jillian


Friday, March 6, 2015

Screen Capcha Friday

Welcome to another edition of Screen Capcha Friday!  Have a great weekend errybodayyy!!

As I scroll through Instagram/Facebook on the hourly daily, I find myself screen shotting things that make me LOL, things that make me get a little teary, and things that I screen shot and immediately send to Boyfriend with a "please buy me onneeeeeeee" text (it's usually a puppy FYI).  Here are a few screen shots, or screen caps as I call them, that I had in my Camera Roll this week.


Does this really need an explanation?

E.T phone home


My life

Dyinggg

Hence the blog name :)

You. Are. Welcome.


Wednesday, March 4, 2015

Tips for Sort-of Homemade Cakes

When I first discovered the food blogging world, my main focus was on the dessert blogs.  I was going through a major baking obsession, and loved baking from-scratch cakes and cupcakes for my peeps.  I really did love and still love baking for birthdays, holidays and just for fun, but making a cake and frosting from scratch is so time consuming, and that doesn't even include the decorating!  I finally took a page out of Sandra Lee's book and adopted a semi-homemade baking style.  Here are a few "Sort-of Homemade" baking tips :)

1. Choose only 1 from-scratch element.  If you are going to make the cake from scratch, use store bought frosting, and vice versa.  This will not only be less stressful and time consuming, but it will give you a ton of time to decorate the cake/cupcakes to reflect the recipient's personality or the occasion.

2. Find a great cake/frosting brand.  My top choice is Duncan Hines.  Their boxed cakes and frosting are low-priced and the quality is great.  I tested out each brand to see which one got the best feedback.

3. Determine the "goal" of the cake.  Why are you baking this cake?  Is it a birthday?  Do you just feel like it?  Are chestnuts roasting on an open fire?  Once you figure this out you can start planning the decorations!  I like to choose 2 candy and/or chocolate items that would best fit the occasion, and add them onto the cake for a fun but clean look.

4. Start baking two nights ahead of time.  When I am baking a cake for a birthday or holiday, I usually make the cake two days before.  Once it has completely cooled, I wrap it in at least 3 layers of clear wrap and store it at room temperature.  I find that if you store the cake in the refrigerator overnight the cake can become dry and crumbly, where keeping it wrapped at room temperature helps keep the moisture.  This will allow you (almost) all the time in the world the night before to prep the frosting and decorate.

5. Use your heart and soul!  It may sound cheesy, but I really believe in making food with love.  If you love making food for people, cool!  It will show in the final product, no matter how homemade or not homemade it is.

Here are some of my favorite sort-of homemade goodies :)

Cake for an office birthday.  Duncan Hines cake with homemade Nutella frosting and candy/chocolate decorations
Boxed cake and homemade buttercream frosting


Got a little Pinteresty with these guys!  Boxed cake, but I separated & dyed the batter to create the camo look


Boxed cake (are you sensing the pattern?) with homemade frosting :)


Homemade carrot cake with homemade cream cheese frosting for Easter!

Tell me your baking secrets!!  I want to knowww!!!


Xoxo 

Jillian 


Tuesday, March 3, 2015

Easy Roasted Potatoes

Can someone please turn off the snow machine?  This is getting a little ridiculous.  My car can't take this anymore and neither can my anxiety.  I'm pretty sure I aged 5 years on Sunday, when I drove home in what was only supposed to be 3 inches of snow from my girlfriend's baby shower.  The trip normally takes between an hour and an hour and a half, but it took me just about 4 hours.  And I had to pee for 2.5 of them.  Not cool.  I am extremely jealous of my mom, who is in New Orleans for a few days with her girlfriends, just for S's and G's (shits and giggles for those of you who aren't used to my abbreviations by now heehee), and all I know is that she is in capri pants and flip flops.  Not cool.

These next few days shall be filled with quick and easy dinners to make for the Padre, since he works in Manhattan and needs to take the LIRR every. freaking. day.  Poor guy.  These potatoes (or po-tay-toes, as he calls them) are a great side dish, super quick and take about 30 seconds prep time and 30 minutes baking time (35 if you want to be exact).


What you will need to serve 2:
  • 3 large Russet Potatoes (my rule is 1 per person plus 1 more)
  • Basil
  • Parsley
  • Garlic Powder
  • Oregano
  • Olive Oil for drizzling
  • 1/2 of a white onion
Preheat your oven to 350.


Rinse your potatoes and cut each into 1/2 inch pieces.  Place in a large bowl, and drizzle with enough olive oil to lightly coat the potatoes (I would start with 2 tablespoons and add as needed).  Sprinkle the potatoes with the basil, parsley, garlic powder, and oregano, and toss to evenly distribute to each potato.

Cut the onion into small slivers, add to the potatoes, and toss the mixture.

Spread evenly on a baking sheet, drizzle with some additional olive oil, and bake for 30-35 minutes, or until golden brown.

Serve immediately.


Now if you will excuse me, I will be taking a blow torch to my driveway.


Xoxo

Jillian